Want to know how to create a custom sidebar in WordPress? If yes, you’re in the right place.
A sidebar in WordPress is an area of your website where you can display important and tiny bits of content. You can customize the sidebars via widgets to showcase the content different from the main web page.
For example, you can place the latest posts, popular articles, search bars, advertisements, etc. on the sidebars as per your need.
Hence, creating a custom sidebar in WordPress is a great way to extend the functionality of your website. And in this article, we present a detailed step-by-step guide for this process. So, stick with us throughout the end to know more. Now, let’s get going!
What is the WordPress Sidebar? (Introduction)
Simply, the WordPress sidebar is a widget ready vertical/horizontal column in your site that appears alongside your main content on the left or right side of your web page. The one on the right is called the ‘right sidebar’, and on the left is ‘left sidebar’.
Sidebars are one of the common parts of every WordPress blog. And their main function is to make navigation easy. Plus, you can use a sidebar to display secondary content that adds new features to your web page.
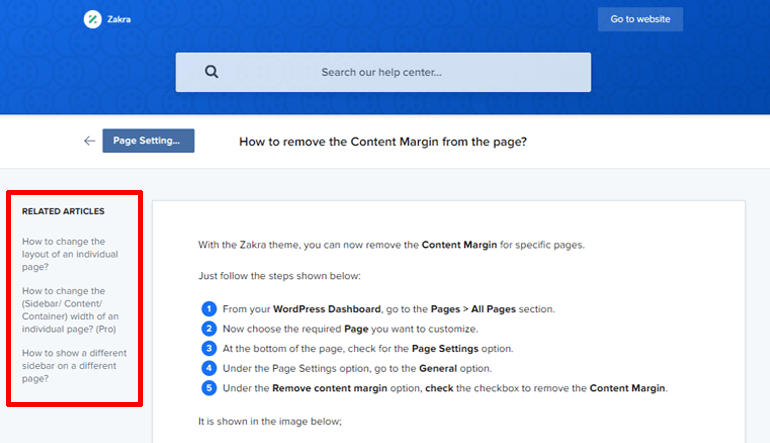
For example, you can see in the screenshot below. The highlighted part represents the sidebar and here it has given us information regarding related articles.
The sidebar in your site depends on your chosen theme by default. Hence, your website’s theme will determine whether or not to have a sidebar. To add on, it also controls the number of sidebars and options for its customization.
With that said, to add the required content in your sidebar, we use WordPress widgets. In WordPress, any widgets are the blocks of content that you can add to your site to enhance its functioning.
Hence, by using the widgets, provides a simple and easy way for you to create and manage the sidebars. This is also why we often refer to sidebars as a ‘widget ready’ area.
Why customize WordPress Sidebar? (Explained)
Sidebars are an important part of designing the layout of a WordPress website. Whether it may be to display content or even as a navigation aid. Besides these, the usage of sidebars will also depend on your requirement on how you would like to build your sidebars.
To create multiple functionalities and try out a different look for your site, you need to customize WordPress sidebars. And when you do that, you simply create a custom sidebar. Using the custom sidebar provides you better options than just a regular navigation bar.
For detailed elaboration, here are some reasons why to customize WordPress sidebar aka create a custom sidebar:
1. Display Personalized Content
The main motive behind creating a custom sidebar is to display the personalized content. It means you can customize the sidebar with the features you want. For instance, you can add featured content like most popular posts, related content, recent posts, and more.
Also, you can put up a search box or even tools like call-to-action buttons and emails. The choice is all yours!
2. Make Your Page Visually Appealing
Using the custom sidebar in WordPress is actually a smart way to try out new styles for your site. With even hampering the core content, it lets you display the content in an appealing way. Thus, this idea could be a great way to attract more visitors and engage the ones who are already in.
3. Create Different Sidebar for Each WordPress Page and Post
By default, a sidebar on the blog usually displays the same content throughout your site. However, sometimes you might want to change them for specific posts or pages. In that case, you can use a custom sidebar plugin. Using the plugin, you can easily assign different sidebars to different pages and posts.
4. Enhance the Existing Navigation
There is no doubt that the custom sidebar extends the functionality of your website. In every way, it proves to be an interesting way to implement new features. And with these enhancements, you can add custom elements or paid advertisements.
Furthermore, you can utilize the space beside the regular top-bound navigation bar and provide more info.
How to Create a Custom Sidebar in WordPress? (Beginner’s Guide)
Now, after you’ve learned about the WordPress sidebar and the reasons why to customize it, let’s move towards how to create a custom sidebar in WordPress. The explained processes are totally beginner-friendly so you don’t have to worry about anything at all.
Method 1: Customize the Sidebar From the Widgets Page
This method is the simplest way to create a custom sidebar in WordPress. By default, you can directly add, edit, and remove the widgets to your sidebar from the WordPress widget page.
However, you have to make sure that your chosen theme supports the sidebar option. If the theme comes with a sidebar option, then only you can create a sidebar with widgets.
Note: The recent default themes in WordPress like twenty-twenty and twenty twenty-one don’t offer sidebar features. If you want to use the sidebar using those default themes, you can use the twenty seventeen theme.
But here we’re using Zakra theme as it’s fast, secured, and offers innovative features. You can easily install free version of the Zakra theme from your WordPress website.

A) How to Add Widgets in Sidebar
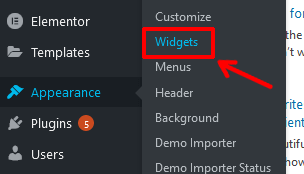
To add the widgets in the sidebar through the WordPress dashboard, start by logging in. Click on “Appearance” from the WordPress menu on your left-hand side. Then, go to the “Widgets” option.
Welcome to the Widgets Window of your website’s dashboard. It is also the place where all your widgets stay. On the left side of your ‘Widget’ page, there are Available Widgets. Whilst, on the right there are the mentioned areas where these widgets can go.
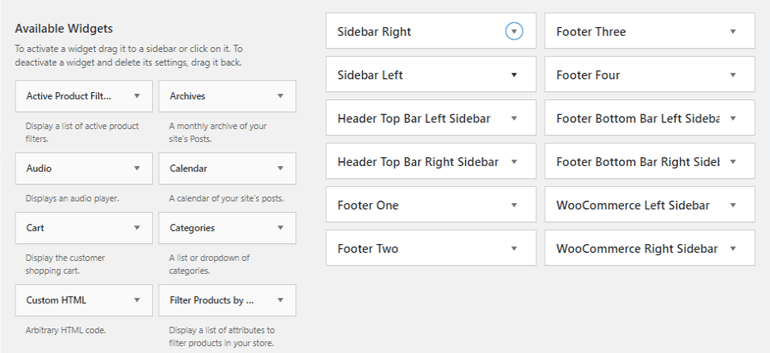
There are sections like sidebar, footer, header, etc. Since you’re using the Zakra theme, you get some extra options than you get by using the default ones. For example, you get the options of Sidebar Left and Sidebar Right.
Likewise, there are sidebar sections for the WooCommerce page as WooCommerce Left Sidebar and WooCommerce Right Sidebar.
The available widgets are precisely on your left side. If you feel you’re missing something, scroll down further and you will find ton of other options.
Amongst them, you can add the ones you think are necessary for your site. You can simply drag a widget and drop it to the sidebar box where you want the widget to be functional.
For instance, if you want to put the ‘Archive’ menu in the right sidebar, then you would simply drag the widget from the left to the ‘Sidebar Right’. You can subsequently give it a proper title to the widget and select the way you want to display it.
After you complete, don’t forget to click on the ‘Save’ button.

This way, you can add the built-in widgets to the sidebar of your website. To check the saved changes, you have to visit the website. It’s kinda a drawback of this method that you can’t add or edit the sidebar with a live preview. For that, you need to go through WordPress Customizer (which we’ll discuss in Method 2).
B) How to Remove The Sidebar Widget
Now, after knowing how to add the sidebar widget, let’s learn how to remove the unwanted ones.
It’s easy and halfway similar to the process of adding. Go to Appearance>>Widgets. After you’re on your Widgets Window, click on the location which has the unwanted widget. Select the widget and click on its ‘Dropdown Arrow’.
The panel opens up with various options. Thereafter, click on the ‘Delete’ button to delete the widget from your sidebar.
After doing the task, you can check the changes by previewing your website.
Method 2: Create a Custom Sidebar Using WordPress Customizer
You can create, add, edit, and remove the sidebar widgets also from the WordPress Customizer. It’s an alternative method of creating sidebars using the widgets. It may be an even better way as you can see the changes live as you make.
If you’re confused, then you should know that you can now access widgets also from the WordPress Customizer, not only from the widgets page (Appearance>Widgets).
Now, let’s get started with this method using the popular Zakra WordPress theme.
Step 1: Choose a WordPress Theme (Zakra)
As mentioned earlier, the options of customization in the custom sidebars majorly depends on the theme you’re using. Hence, this primary step in choosing the right WordPress theme is essential.
Make sure, you select the theme with plenty of sidebar options so that you can completely customize them. To add up, the theme you chose shouldn’t be complex to use and offer unmatched features.

Not all themes fulfill these criteria but with our Zakra theme, you get to grab them all. Even with the unpaid version, there are plenty of customization options for sidebars. Here, we select the Zakra theme to create a custom sidebar in WordPress using a WordPress customizer.
Firstly, you need to install the chosen theme on your site. For your guidance, we have an article about ‘How to Install a WordPress Theme?’. This step by step guide will surely help you get through.
Along with the installation, the activation of the installed theme is important too. You can activate your new theme at this point using the ‘Activate’ button.

Hereafter, your entire page will have a new design and offers the highlighted features.
Step 2: Create a Custom Sidebar in WordPress
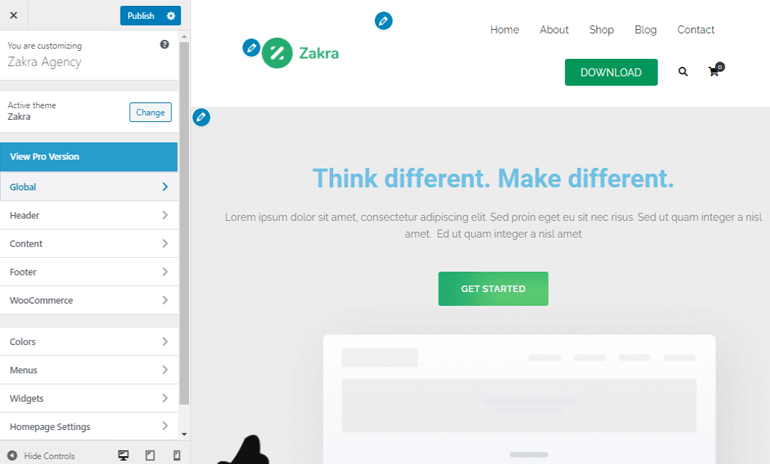
In the next step, navigate through Appearance>>Customize.

The WordPress ‘Customizer’ page opens up and appears like this on the screen. It comes with multiple options to modify and custom your WordPress site.
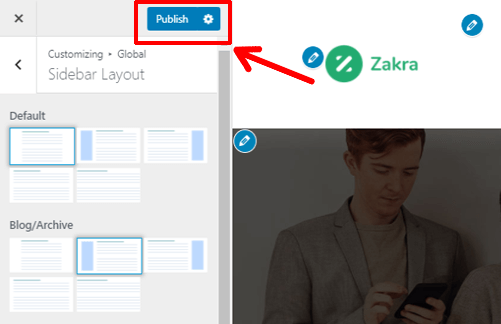
Navigate to the left menu of the page and click on Global>>Sidebar Layout.
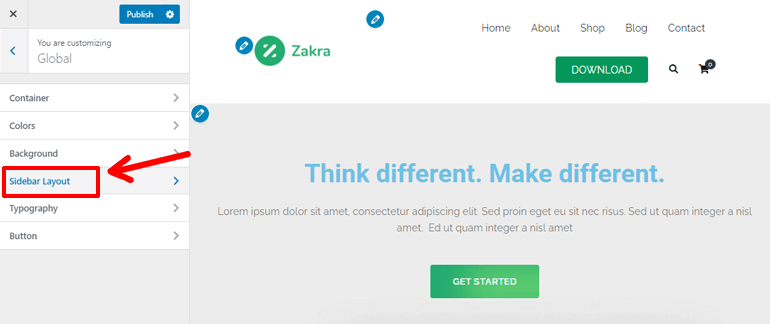
Then, you’ll encounter a range of layout options for a sidebar.
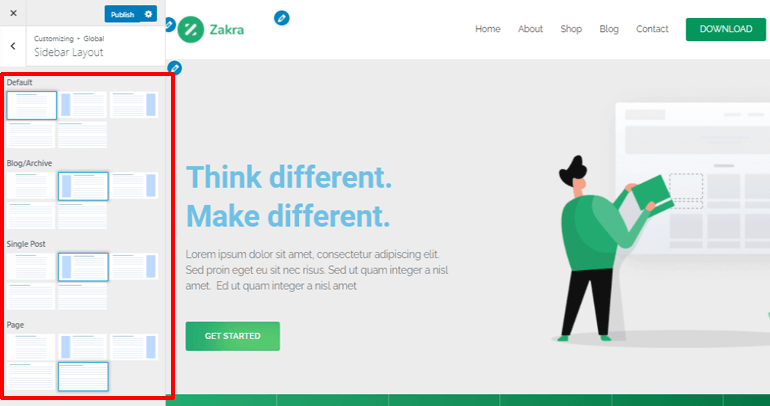
You can also find the four specific categories as Default, Blog/Archive, Single Post, and Page. Further, each of them has four layout options: Content Centered, Left Sidebar, Right Sidebar, No Sidebar, and Stretched.
To unlock more features, you’ll have to go for the premium version of the Zakra theme.
Amongst them, you can choose either the ‘Right Sidebar’ or ‘Left Sidebar’ layout. Here, we’re selecting the left sidebar for our blog/archive. It appears on your website as shown in the image below.

Save the changes made by hitting the ‘Publish’ button. Up to this point, you’ve successfully created a new sidebar in your WordPress.
Step 3: Add Widgets in Sidebar
Now, to make your sidebar functional, you need to add widgets to the created sidebar. In WordPress, widgets are blocks of content that add a specific feature or function to your site. You can simply place them through the drag & drop interface without touching any codes.
Hence, it’s an easy way to add dynamic items to widget-ready-areas like sidebars.
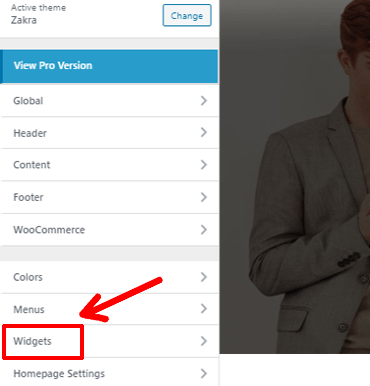
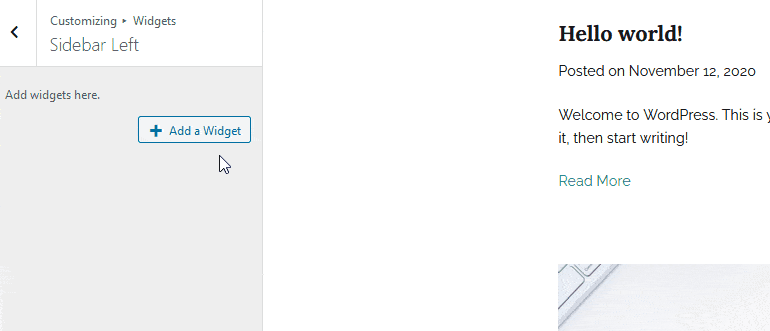
To do that, you again have to navigate Appearance>>Customize. Select the ‘Widgets’ option from the main menu of WordPress customizer.
You are then directed to the page where you can customize the widgets. You can see the available widget ready locations towards your left. Likewise, on your right, you have a live preview of your website. Here, you can navigate to other pages while using the Customizer to view and edit the widgets.
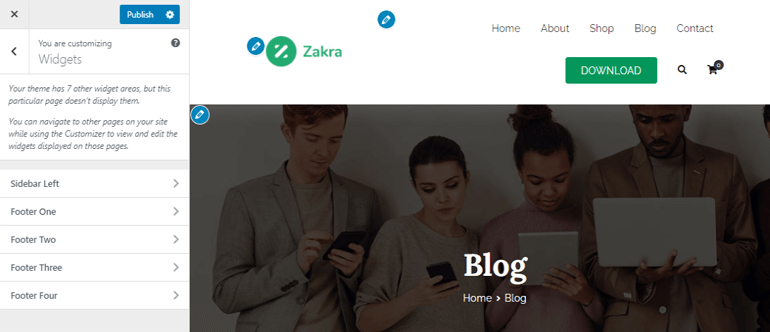
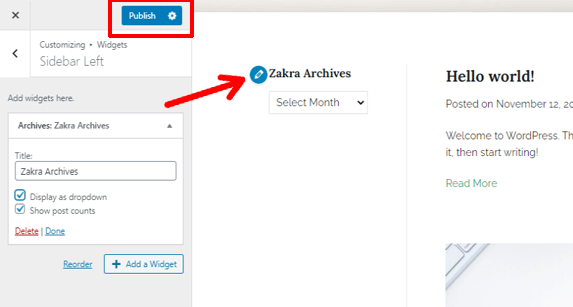
As we created a sidebar for our blog section earlier, firstly we navigate through that page. You can then see the option of ‘Sidebar Left’ on the left menu. Click on it and look for the ‘Add a Widget’ button.
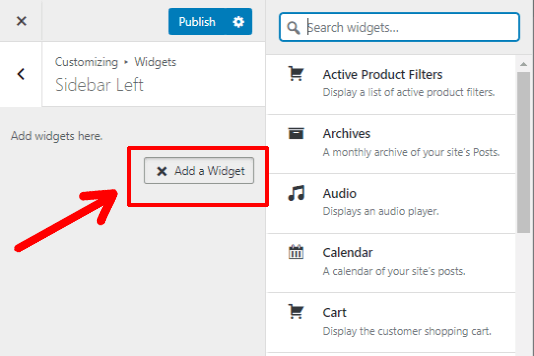
Once you press the button, a list of different widgets appears to its right. Click on the widget you want to add and that’s it. The widget you chose will be there on your sidebar. You can give it a proper title and even manage its settings. Afterward, wrap up by clicking on ‘Publish’ to save the changes on your site.
So, this is how you can add widgets to the new sidebar in WordPress. Remember, you can add any type of widget from pages to posts, images to search bar, and many more.
How to Edit, Manage, and Remove the Widgets in the Sidebar?
We now know how to create a new sidebar in WordPress and add the required sidebar widgets. But you might sometimes have to edit and manage them. Also, in some cases, you may want to remove the unnecessary widgets.
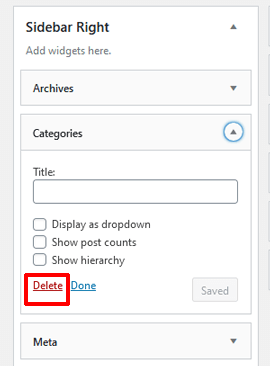
You can perform all these activities via the WordPress Live Customizer itself. You just have to click on the location you want to edit. Then, the customization panel for that widget will appear on your left. You can make the necessary changes to it.
For instance, if you clicked on the ‘Categories’ widget, you get to add a title for it. Also, you can select the option for its display on the sidebar. The available option to edit might vary with different widgets.
But the common options like ‘Title’ remain the same. After you make the changes in the panel, don’t forget to click the ‘Done’ option to save them.
Likewise, you can see the ‘Remove’ option on the same panel. You can simply click on it to delete the widget from the sidebar.
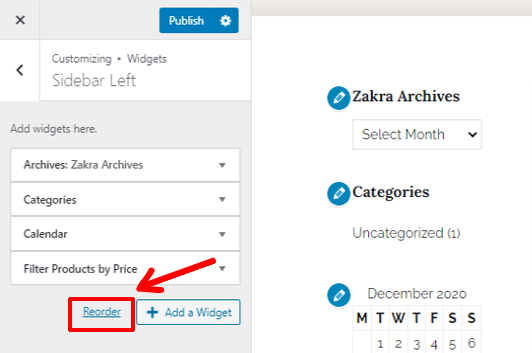
Furthermore, you can find the ‘Reorder’ option on the customization panel. You can arrange the order of your widgets using this option. It also allows the widget to move to the other areas of the site like footer.
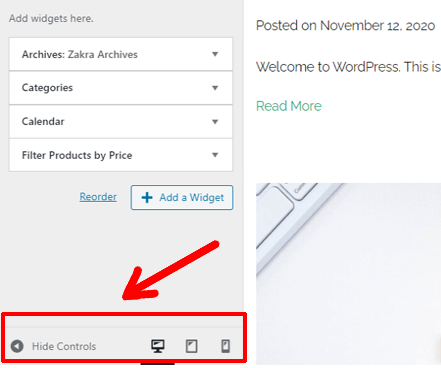
Right on the lower end, there is an option of previewing on various devices like desktops, tablets, and phones. This control handle helps us to create a responsive design and locate the position of the sidebar in those devices.
At last, after making all the changes, click on the ‘Publish’ button located at your top left side.
Method 3: Using Custom Sidebar WordPress Plugins
The next method to create a custom sidebar in WordPress by using the plugins. These plugins are called Custom Sidebar WordPress plugins. They come as a handy option to add tons of extra customization options for your sidebar.
Likewise, if the theme you chose is simple and lacks the sidebar option, this method is the solution. And not to forget, you can use these plugins to assign different sidebar for each post and page in WordPress. All in all, you can do everything that any default theme restricts while customizing the sidebars.
Here are some of the helpful custom sidebar WordPress plugins:
1. Easy Custom Sidebars
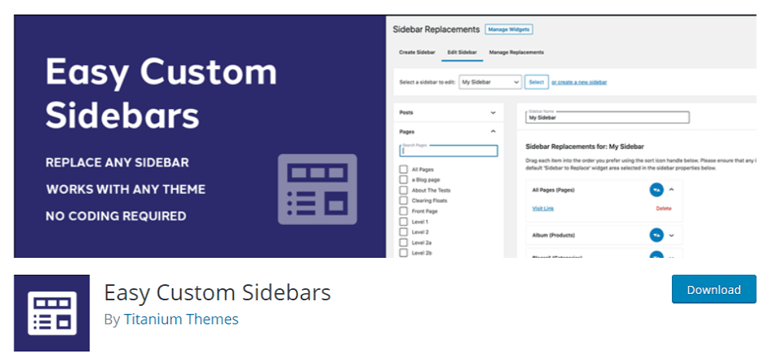
Easy Custom Sidebars, by Titanium Themes, is a great plugin for creating a custom sidebar in WordPress. It’s compatible with any theme and you don’t have to go through any type of coding mess. Moreover, with this plugin, you can create, replace, and manage multiple sidebars/widget areas on any page on your website.
Likewise, this plugin features core WordPress design and customizer integration. They help for the better appearance of created sidebars and to customize them with ease. Also, you get a great user experience with its Ajax search and activate/deactivate custom sidebars.
Hence, if you’re looking for an easy way to replace sidebars or add unlimited sidebar functionality, Easy Custom Sidebars is the plugin for you.
2. SiteOrigin Widgets Bundle
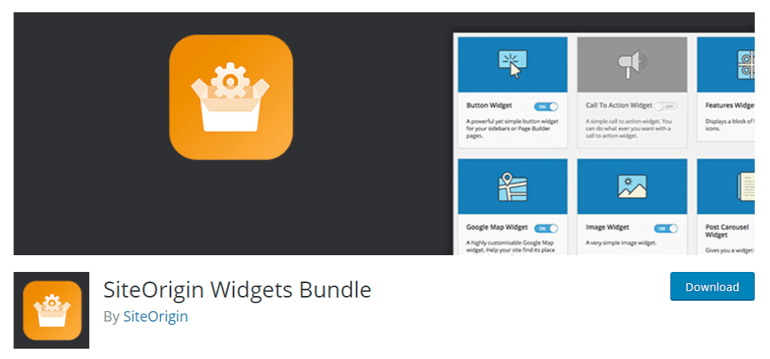
The SiteOrigin Widgets Bundle is the plugin built on a powerful framework. With unlimited colors and 1500+ icons, it features a great collection of widgets. You can use and customize them on your sidebar as per the need of your website. Meanwhile, you don’t have to worry much as this plugin is compatible with every theme and page builder.
Moreover, this plugin is constantly updated and works with the latest version of WordPress. To add on, it also has a strong support team which will help you with any problem you face while using it.
All of these features of SiteOrigin Widgets Bundle make it a versatile plugin. Once you enable it, it will simplify your website through useful widgets and many premium add-ons.
3. Social Icons
Social Icons, by ThemeGrill, is a simple, lightweight plugin that allows you to add a social menu on your sidebar. This plugin is easy to use and features a ton of customization options. Also, you can use it to set your own social icons using font-awesome.
Even if you’re a beginner, you can easily learn to use Social Icon. It’s because this plugin allows you to simply drag the social icons widget in your sidebars and change settings from itself. Also, you can use the shortcode and paste it on any page, post, or anywhere you like.
To Wrap Up,
Creating a custom sidebar in WordPress would be a great option to display various items besides the core content. It allows displaying personalized content from pages to posts, menus to images, and many more.
You can even monetize your site by showing the paid ads on the sidebars. Hence, the sidebars are beneficial for you in every way to extend the site’s functionality.
With that said, the simplest way to add custom sidebars is by choosing a theme like Zakra. This feature-rich theme offers tons of customization on your site including the sidebars. You have the option to choose from multiple layouts and pre-built widgets. With the help of which you can create a beautifully functioning sidebar.
So, that’s a wrap for our article on how to create a custom sidebar in WordPress. Hope you liked what you read. If you felt it was helpful, please do share this article in your circle. The social media handles are right in front of you.
Moreover, if you would like to know more, we suggest going through our articles like “How to Install & Customize Zakra Theme to Make a Pro Website?” and “Best WordPress Lead Generation Plugins 2020“. We’re sure you’ll find them interesting!


![Zakra 3.0 | Zakra Pro 2.0 Release [Major Updates!]](https://i.ytimg.com/vi/g3rifl7kWvg/maxresdefault.jpg)