You have chosen a WordPress theme of your choice but wondering how to install one? Today we’ll be showing you how to install WordPress themes with three easy methods.
You can see that installing a theme in WordPress is an easy process. To help you through this we have prepared this step-by-step guide so that you can install and/or change a WordPress theme or a template.
How to Install a WordPress Theme?
There are basically three variants of how you can install a WordPress theme.
The easiest way to do this is to install the theme via the WordPress backend.
However, if you purchased your theme online, you will usually be provided with a zip file, i.e. a compressed file folder. Normally you can also upload and install this via the backend – but in a different way.
If that doesn’t help, you have to manually install the theme directly on your server via your FTP access. This is a little more time-consuming, but with the right instructions, it is not rocket science either.
In the following we explain how the three variants work.
1. Install a WordPress Theme via Backend
WordPress offers you a variety of free themes. A few of them are already available to you with the installation in your backend. To do this, first log into the backend of your WordPress site.
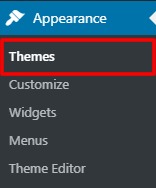
Then select the menu item “Appearance” and then the sub-item “Themes“.
You can now see the themes that have already been installed. One of these themes is active – in our example the theme “Twenty Nineteen“. The other theme is installed but not active. This means that the website is currently designed according to the “Twenty Nineteen” theme.
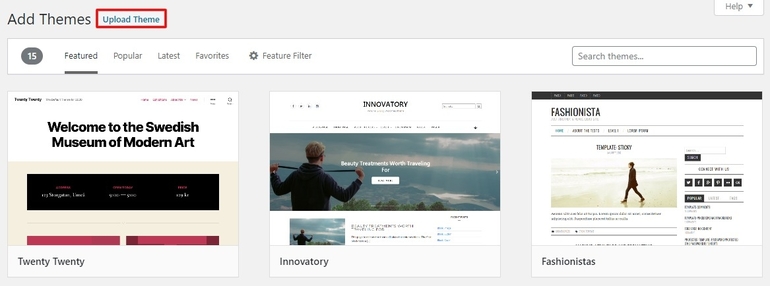
To install a new theme, first click on “Add New” on the bar at the top or on the “Add new theme” tile with the plus sign at the bottom.

You can now browse for themes using various categories such as “Featured“, “Popular” or “Latest”.
Use the “Feature Filter” section to search for specific themes that meet your requirements. For example, you might want to set up e-commerce or have an individual logo that you absolutely want to include on your website.

If you have already selected a theme in advance, simply enter its name in the search bar.
In our example, we choose the theme “Zakra“.
If we move the mouse pointer over this theme, we are presented with two options: “Install” and “Preview“.
Unsurprisingly, when you click PREVIEW, you’ll see a quick preview of the theme. It is important to note at this point, however, that this preview is an example preview. So you don’t get your page displayed in this design, just a sample page.

To install the theme, simply click on INSTALL, which is not surprising either. Now your current theme initially remains active.
But installing the theme has an advantage. After installation you have the option of a LIVE PREVIEW.
The live preview means that you can now view your page with the new theme.
You can activate your new theme at this point using the ACTIVATE button. This means that your entire page can now be seen in the new design – also and especially for visitors. After the installation and activation, your current theme will be deactivated automatically which is “Twenty Nineteen” in this case.
2. Install a WordPress Theme as a zip File via the Backend
If you have purchased a theme online, it is usually made available to you as a download. The file is usually a zip folder, which in turn contains several files.
You don’t have to do anything with this zip folder. You don’t have to unzip it or extract it, nor select individual files.
Fortunately, WordPress offers a practical function which is you can simply upload this folder via the backend and use it to install the corresponding theme.
The procedure is almost the same as in the previous section. Here, too, first, log into your backend. Then select “Appearance” from the menu bar and then “Themes“.
As in the previous method, click on ADD.
The view appears again in which you can choose from different themes.
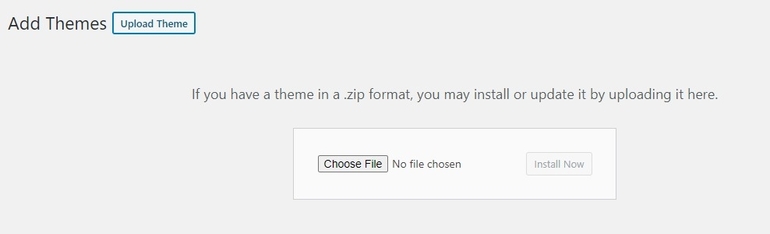
This time, however, choose the UPLOAD THEME option.
Via SELECT FILE, simply select the zip folder on your computer (you must of course know where you have saved it). Then click on INSTALL NOW.
Done – that’s it. And in case you’re wondering: Yes, installing a WordPress theme as a zip file is actually that easy!
3. Install a WordPress Theme via FTP
If you are not successful with the installation of the zip file via your backend, you have to set it for better or for worse via the FTP access. This is a little more complicated than the above procedure, but it is entirely possible.
First, you have to unzip your zip folder. A zip file is a compressed file that saves storage space. If you don’t just want to save the theme but use it, you have to unzip the file. To do this, right-click the zip folder and click EXTRACT ALL.
You will also need an FTP program that will interact with the server. We recommend FileZilla as a free program that you can download online.

After you have purchased a hosting from hosting service providers, you’ll have a login information provided by the server operators.
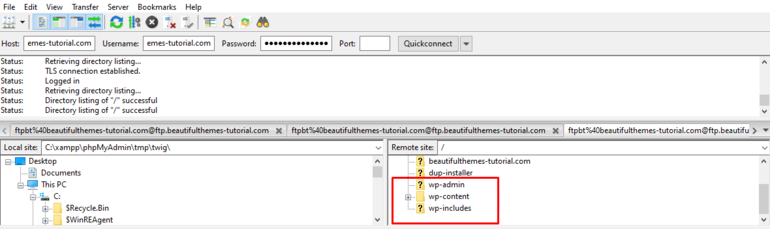
You should enter this information into your FTP program: a host, a username, and a password. In other words, you tell your program which page you want to log into, who you are, and indicate with the password that you have access authorization.
In case of port, most normal FTP servers use port 21, SFTP servers use port 22 and FTP over TLS (implicit mode) use port 990 by default.

Then click on “Quickconnect” or the corresponding button if you are using a program other than FileZilla.
Ideally, you now have access to your server.
If you cannot establish a connection, contact your hosting service provider.
Now click through the directory on your website in your WordPress content. There you will find your WordPress folder with the sub-folders “wp-admin”, “wp-content” and “wp-includes”. Select the WP-CONTENT folder.
Here you can see a folder with the title “themes” alongside others.

This is exactly the folder you were looking for! When you open it, you can find all the themes that have already been installed. Interestingly, our example folder contains the “Zakra” theme, which we installed via the backend in the penultimate chapter of this article.
To upload your new theme, select the unzipped/extracted (!) Theme folder on your computer via your FTP program. Our example topic is called “Zakra Pro“. We select this via FileZilla in the left window and then right-click the option UPLOAD.
Perfect: after the upload, the new theme folder “Zakra Pro” also appear on the server alongside the other themes. The new theme is now installed.
What To Do Once the WordPress Theme is Activated?
As soon as the new theme is active, be sure to check all individual pages on your website. Are all elements still in place? Are functions and plugins – for example newsletter registration – still displayed correctly? Can all texts be seen on the page?
If this is the case, you can make adjustments to your site using the Customizer.
Each theme offers different customization options. The range of functions of some themes is very large – other themes, on the other hand, only allow very few individual adjustments.
You have to make some adjustments directly via the CSS code if these are not provided for by the theme itself in the customizer.
Many WordPress themes provide documentation when it comes to customizing the theme. Make sure to check them or contact the theme developers in case you come across any problem.
Do you want to learn more about WordPress plugins and themes? Then you can feel free to check these articles:
- Why & How to Update WordPress, Themes & Plugins?
- How to Create a Contact Form in WordPress?
- Best Free WordPress Themes and Templates


![Zakra 3.0 | Zakra Pro 2.0 Release [Major Updates!]](https://i.ytimg.com/vi/g3rifl7kWvg/maxresdefault.jpg)