Do you want to learn how to add social media share buttons in WordPress?
Social share buttons are one of the popular marketing tools through which you can promote your website. They are simple buttons you can add to your blog articles with which your audience can share your content on social media. This will help to circulate your website content and drive more traffic.
So, you must be aware of how to add social media share buttons to your WordPress blog in order to promote it. You don’t know how to do it?
No worries! In this article, we’ll guide you how to add social share buttons to your WordPress website (step-by-step).
Let’s begin.
Why Add Social Share Buttons in WordPress?
In today’s global world, most of the information is circulated with the help of social media. People are more engaged in social networking and spend most of their time using social media. Due to this, social media has become a medium through which people exchange information.
Social share buttons connect your web content with social media. The readers who read your WordPress blog content can easily share the information with their social circle using social share buttons. In this way, the web contents can be circulated.
For example, you can see social share buttons on this article also; right below the article title and featured image. Scroll to the top and you can see it! Also try sharing this article!

Let’s point out some of the general reasons that show the importance of adding social share buttons in WordPress:
i) Generate more traffic
You can generate more traffic to your website with the help of social share buttons. The visitors of your website can share the articles of your website on different social platforms by clicking on the share buttons. This will drive more traffic as a large number of visitors will visit your website to read the shared article.
ii) Create brand value
Social share buttons can help you in creating the brand value of your website. When your articles and blogs get circulated on social media, the number of followers will increase. Your website will start getting more recognition and gain popularity. This will create the brand value of your website in the market.
iii) Promotion of the website
Social share buttons will ultimately help you to promote your website. When your site gets more traffic and its brand value grows, your site will gain more authority. In a nutshell, social sharing helps a lot in the promotion of your website. .
How to Add Social Share Buttons in WordPress? (Step by Step)
We discussed the importance of social share buttons and their need on your website. Now, we’ll discuss the process to add social media share buttons in your WordPress blog. Let’s have a look at the step by step process of adding the social share buttons to your WordPress website.
Step 1: Choose the Best Social Share Plugin
The first step you need to follow in order to add the social share plugin is to decide which social share plugin is best for you. You need to choose the social share plugin which you consider suitable for your website.
You can find a variety of social share plugins in the market that come with various features. But you must choose the one that is affordable and has enough features to help you promote your site.

Here, we’ve chosen Easy Social Sharing for this tutorial. We chose this because it’s one of the best social share plugins for WordPress that you can consider using. It’s free and comes with a fully responsive design. It has multiple features using which you can easily add and customize the share buttons.
You can choose from 18 popular social sharing buttons and add them to your website. Other features like social share count, multiple layouts, multiple designs are also available in it which is useful to promote your website.
Step 2: Install and Activate the Social Share Plugin
After choosing the best social share plugin, the next step is to install and activate the social share plugin. For this, log in to your WordPress dashboard.
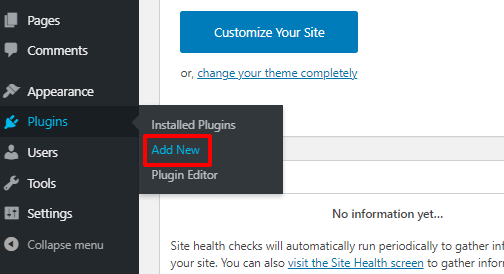
After that, try to find ‘Plugins’ on your left-hand side of the screen. Hover your mouse cursor over it and click on ‘Add New’.
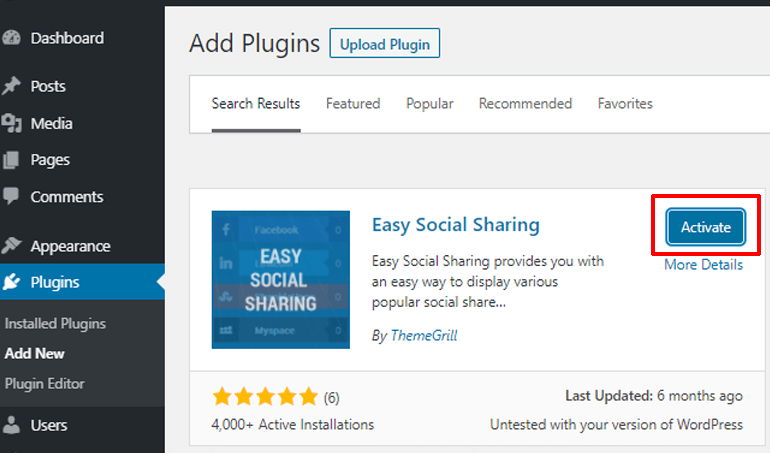
Now, you’ll reach the “Add Plugins” page. There, try to locate a search box on the right top of your screen. Then, type ‘Easy Social Sharing’ on the search box after which it’ll appear in the search results. You’ll see an ‘Install Now’ option next to the plugin. Click on it.

After that, the installation process will begin. Click the ‘Activate’ button next to the plugin after which the plugin will be activated successfully.
Step 3: Configure and Customize Social Share Plugin
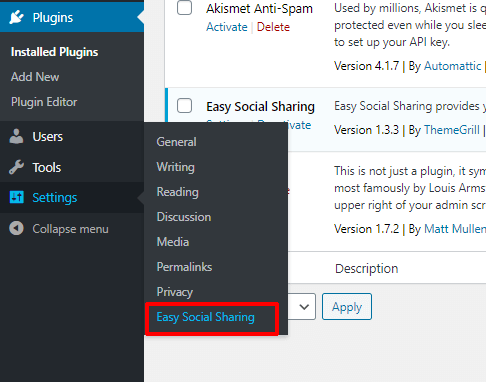
Now, the next step is to configure and customize the social share plugin. On your WordPress dashboard, find settings on the left-hand side of the screen. Hover your mouse cursor over it and click on ‘Easy Social Sharing’.
After that, you’ll reach a page from where you can change the settings of the plugin. You’ll find options like ‘General Options’, ‘Network Options’, ‘Layouts Options’ to customize the plugin. Let’s discuss each of the options in detail.

General Options
From ‘General Options’, you can add the options available in the plugin. You can choose the specific locations i.e. inline (above/below post, pages), sidebar (left/right middle corner of the browser), etc. where you want to display the share button. You can also choose to display the buttons on either all screens or display specifically on some screens.
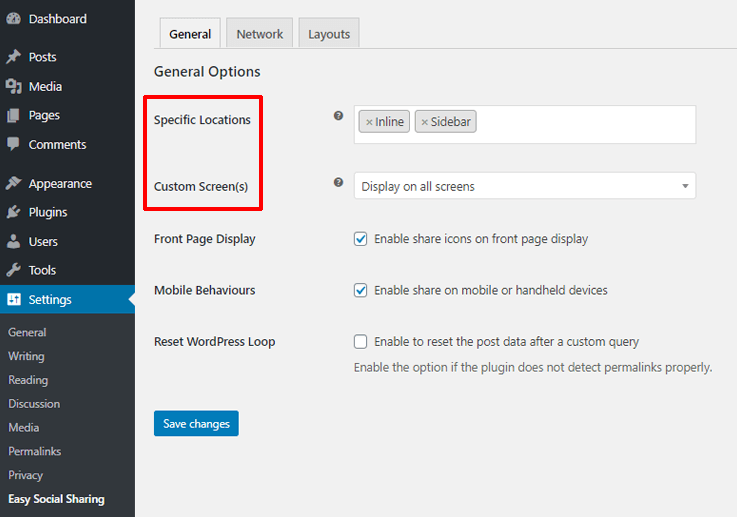
Furthermore, you can enable or disable the share buttons on the front page (Home). You can also use another option to allow the display of social share buttons while browsing using mobile devices. After that, click on ‘Save changes’ to save the settings you added.

Network Options
Through ‘Network Options’ you get two options: Social Networks and Social Options. In ‘Social Networks’, you’ll see a list of various social sites. From there select the preferred social network by hovering your mouse cursor over it. Then, you’ll see the ‘Edit’ option appearing there. Click on it.

After that, you’ll need to enter the details in the ‘Description’ and ‘Minimum Count’ box. At the end of the table, you’ll see a ‘Save changes’ button. Click on it to save the changes you made.

Now, select the ‘Social Options’ where you need to add credentials to gain access to social media functionality. You can add the ‘Twitter Username’ so that when someone tweets your posts, you’ll get the credit on the tweet. You can enable the ‘API Supported Network’ option to provide support for API Supported Network. Don’t forget to ‘Save changes’.

Layout Options
Likewise, from ‘Layouts Options’ you get access to Layer Color Options, Inline Layout, and Sidebar Layout options. Through ‘Layer Color Options’, the background color and background hover color of the share icons can be customized. You can also enable the custom colors and click on ‘Save changes’.

Now, select ‘Inline Layout’ where you’ll find different options to customize the share button displayed in Inline. You can choose the icon shape and layout for the social sharing button. Also, you can choose the location where you want to display it. Moreover, you can enable networks label, social share counts, display total share counter, etc.
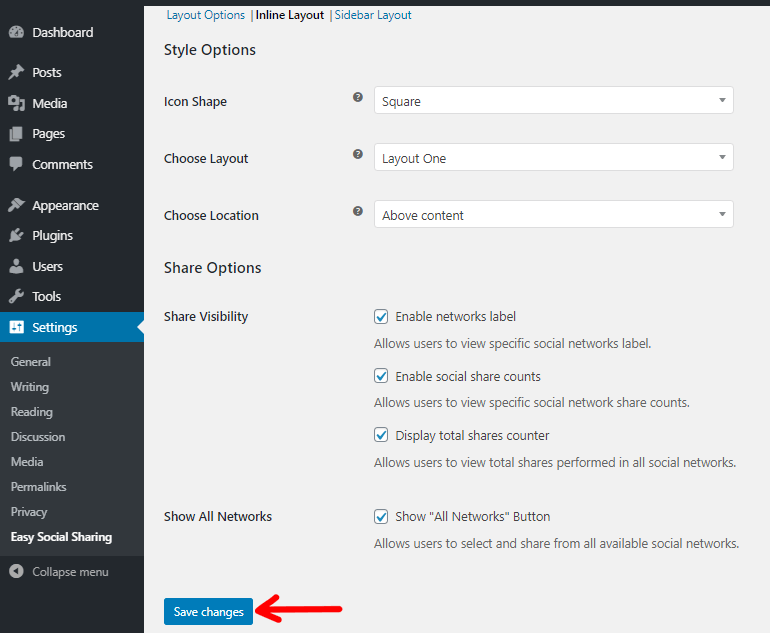
At last, click on ‘Sidebar Layout’ to customize the share button displayed in Sidebar. The icon shape and layout orientation of social sharing buttons can be changed. You can also enable social share counts, display total shares counter, and show “All Networks” buttons. In the end, click on ‘Save changes’.

You can also live preview the changes in the shape of the icon and layout format as you customize it. Just look at the right-hand side of your screen on the settings page and you’ll see the changes happening in real-time.
Step 4: Preview Social Sharing Buttons on Your WordPress Blog & Start Sharing
The next thing you need to do after completing the configuration and customization of the social share buttons is to preview the changes. After you have completed adding a new post in your WordPress dashboard, simply click on ‘Preview in new tab’.

Now, you’ll be directed to a new tab from where you can view how your post will look after it’s published. You can see how the share buttons appear on your website after the changes you made. Make sure everything is as per your need.

After you are satisfied with the changes made for the social share plugin, you can start using it on your website. For that, you need to publish your content first. Go to the previous tab from where you previewed the content. Then, click on the ‘Publish’ button which is located at the top-right of your screen.
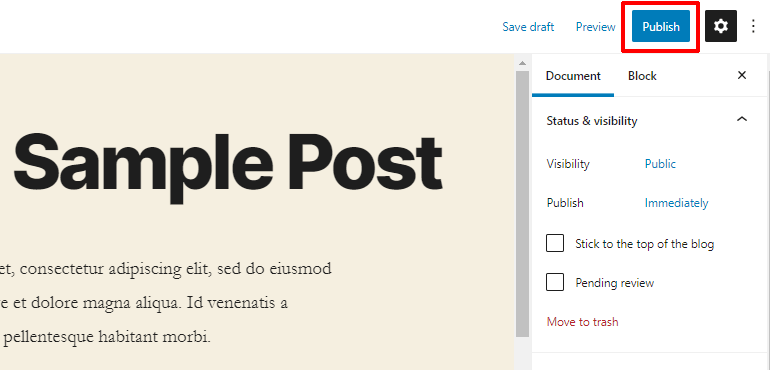
That’s all. Now, you have successfully added the social share buttons in your WordPress site.
Conclusion
So, in this way you can add social media share buttons to your WordPress blog. You can follow the step by step process and install the Easy Social Sharing plugin to your WordPress dashboard. After that, you can customize it with the given options and start using it on your website.
We expect that this article was useful to you. We also hope now you’ll be able to add social share buttons to your WordPress site by following the steps given here.
If you’re interested to add more options to your website, then check our list of best WordPress plugins. Also, check our collection of the best free WordPress themes for unique site design.
Don’t hesitate to circulate this article among your circle. Leave a comment if you have any query, feedback or suggestions regarding this article.


![Zakra 3.0 | Zakra Pro 2.0 Release [Major Updates!]](https://i.ytimg.com/vi/g3rifl7kWvg/maxresdefault.jpg)