Do you want to create a real estate website using WordPress? Then, this article is just the thing for you.
Creating a stylish and fully functional real estate website can help take your real estate business to the next level.
As a result, it can promote your business and help you attract new customers.
Building a real estate website isn’t rocket science. Thus, by following the steps outlined in this article, you should be able to get your site up and running in no time.
Ready? Let’s begin!
Why Create a Real Estate Website Using WordPress?
Before anything else, let’s first briefly discuss why to create a real estate website using WordPress.
WordPress is open-source software. It means that its code is distributed under a license that authorizes all the users to read it but also to make modifications to it.
In this way, you have almost infinite creative freedom, and also the support of a very large community of contributors.
Not only that, but WordPress also offers a very large number of plugins. These extensions are grafted to your site to add those extra functionalities which might be missing on WordPress itself.
As part of your real estate agency, you can, for example, add appointment booking modules or tools such as Google Maps to your professional site.
Plus, installing WordPress is completely free, which isn’t the case with all the tools you’ll find to create a real estate website.
Besides, the other reasons for using WordPress are as follows:
- It’s very flexible, so you can make your real estate site exactly the way you want it.
- The software is 100% free (although you must pay at least a few dollars a month to host it).
- WordPress is a popular Content Management System (CMS) empowering over 42% of all websites on the internet.
- It’s beginner-friendly, and you can always get the help you need from its huge community.
While we are discussing WordPress, you should know that there are two versions of it, WordPress.org and WordPress.com.
WordPress.org is a self-hosted platform where you must find the hosting on your own. However, this platform is highly flexible and offers you full control over your site.
On the other hand, WordPress.com is a fully hosted platform. But it’s quite limited in functionality and doesn’t give you complete control over your site.
Here, we are talking about the self-hosted platform with greater flexibility, i.e., WordPress.org.
How to Create a Real Estate Website Using WordPress? (Step by Step)
Having talked about why create a real estate website with WordPress, let’s move on to the step-by-step guide.
Step 1: Get a Domain Name and Purchase Web Hosting
If you’ve decided to use WordPress to build a real estate website, then the first step is to choose the right domain name and hosting plan for your project.
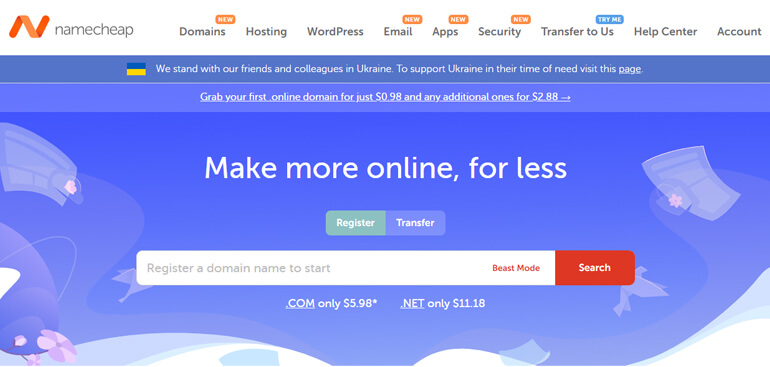
Buy a Domain Name for Your Real Estate Website
Ideally, your domain name is the name you give to your real estate business, using which the customers will be able to find you online easily.
For your convenience, you can use domain name generators that will help you find a suitable name.
After coming up with a cool name for your site, you can register it via domain registrar companies.
Namecheap and Domain.com are amongst the best domain registrar companies that are worth keeping an eye on.
Purchase a Web Hosting
Web hosting is simply a space on a web server where your website will be located. After purchasing the space on the server, all your website’s data will be stored here.
Thus, the users will be able to access your site via World Wide Web (WWW).
Speaking of hosting there are many options, from cheap to more expensive managed WordPress hosts. So, make sure to check these things while purchasing web hosting.
- Automatic or one-click WordPress installation feature
- Good Uptime
- HTTPS support to allow a secure connection
- Affordable pricing
- Reliable support
Some of the best WordPress hosting providers that we recommend using are SiteGround, Dreamhost, Bluehost, etc.

They are officially recommended by WordPress too. Moreover, they’re designed to speed up WordPress development.
If you’re having trouble choosing one from the different web hosting providers, we recommend that you read our article on the best web hosts for WordPress.
Step 2: Install WordPress
The majority of professional web hosts offer a simplified installation for WordPress nowadays.
A good example is SiteGround which offers a simple click-and-install option for a fast WordPress launch.
Once you install WordPress, you’ll be able to log in to your site’s admin panel (WordPress dashboard). Thus, you can easily edit, manage, and configure your site from here.
Step 3: Install a Real Estate WordPress Theme
One of the main benefits of using WordPress is the wide range of themes, plugins, products, and services it offers.
Thus, you can find a large selection of free and premium WordPress themes for creating real estate websites as well.
However, before choosing the theme, you need to consider the points below.
- Appearance: If you don’t want to spend time redesigning your site, choose a site that best reflects your style and brand.
- Features: Pick a theme that contains the features you need and is relevant to your real estate business.
- Customization: If you are design savvy and want to create a unique real estate website, choose a theme that provides advanced customization options.
- Pricing: Themes vary in price, so pick one that suits your budget. Premium plugins can sometimes be included in the price of a premium theme, which can save you money in the long run.
- Always check demos and read theme reviews before purchasing.
To perfectly complement the purpose of the real estate website, we’ll be using the Zakra theme in this tutorial on how to create a real estate website using WordPress.
It meets all the requirements needed to create a real estate website.

Install Zakra Free
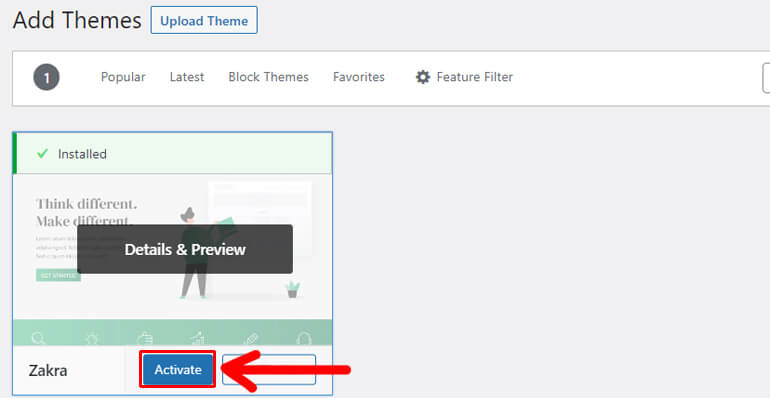
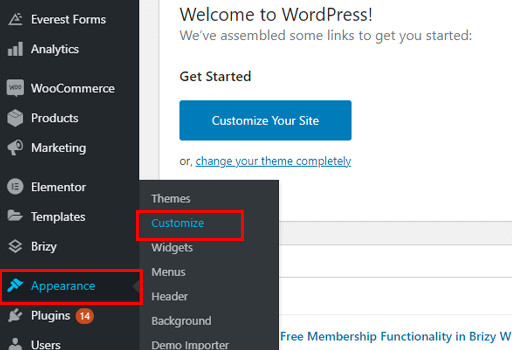
Thus, to install a Zakra theme, go to Appearance >> Themes from your dashboard and click Add New button.

Now, in the search box, type Zakra. Once the theme displays, hover your mouse over it, and hit the Install button.

The theme installs in no time. After that, hit the Activate button to activate the theme on your site.
Since the real estate template is only available in the pro version, we’ll also walk you through the steps on how to install the pro version of Zakra. So, here we go.
Note: Zakra Pro plugin requires the Zakra theme to work. So, ensure you install and activate the free version before you proceed.
Install Zakra Pro
First of all, you should purchase Zakra Pro by visiting the official site of Zakra. It has three different pricing options as follows:
- Personal – $59/Year for 1 Site
- Personal Plus – $67/Year for 3 Sites
- Developer – $209/Year for Unlimited Sites

However, you need to buy the Personal Plus plan or above to get access to the premium Zakra demos.
Once you buy the suitable plan for your site, you’ll be to log in to your user account page from the Zakra homepage.
So, from your account dashboard, go to the Downloads tab and download a zip file of Zakra Pro.

Keep in mind that Zakra Pro is a plugin. A combination of the Zakra theme and Zakra Pro plugin makes a premium Zakra theme.
So, instead of uploading a zip file in a theme, upload it via the plugin section.
To do so you need to go to your dashboard, navigate to Plugins >> Add New >> Upload Plugin. Then, choose a zip file and click on Install Now button.

Also, make sure to click on the Activate button after the installation process.
Now you’ll be asked for a License Key to get started. You can find the license key under the Licenses tab of your user account dashboard.
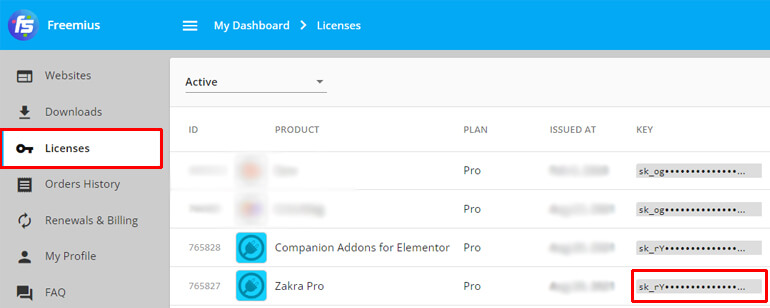
Simply, enter that unique code and click the Agree & Activate License button to continue.
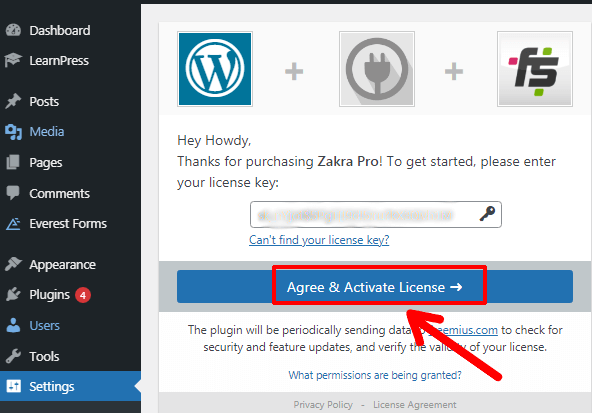
With that, you’ve successfully installed Zakra Pro on your site.
Note: We also have a detailed guide on installing Zakra Pro.
Install Companion Addons for Elementor
Not to mention, we also need the Companion Addons for Elementor plugin to get full access to the starter demos.
Once you download the zip file of Companion Addons for Elementor from your account dashboard. The installation process is the same as we did earlier for Zakra Pro before.
Firstly, navigate to Plugins >> Add New. Then click on the Upload Plugin button. Here, choose the Companion Addons for Elementor zip file and press the Install Now button.

That’s it. Now you can use premium demos of the Zakra theme.
Step 4: Import a Real Estate Demo Website
Now you can import any demo you want or require for your website using the one-click demo importer. Here, we’ll show you how it’s done.
Once you activate the Companion Addons for Elementor plugin, a welcome appears at the top with Get started with Zakra button.
Clicking on it automatically installs and activates the ThemeGrill Demo Importer plugin that enables you to import a demo in a click.

In case the welcome note doesn’t appear you can go to Appearance from the dashboard and click on the Zakra Options.
On the right side of the page, you’ll see an option for Starter Demos. Here, click on the Install ThemeGrill Demo Importer Plugin option. Then, the plugin will be installed and activated automatically.

After that, you’ll reach the Demo Importer page.

As you’ve successfully installed Zakra Pro, you can now get access to all the premium starter templates.
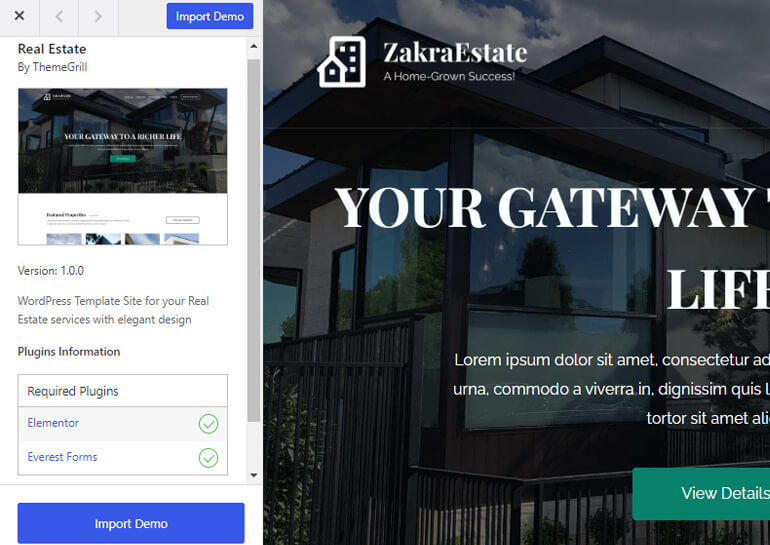
So, you can now search for the real estate demo and hover your mouse over it. Next, hit the Import button.

Contrarily, you can also click on the Preview button to preview the demo website.
If you preview the demo website, you’ll notice the Plugins Information box where the plugins required for your starter site will be displayed. Here, the plugins required for the real estate are:
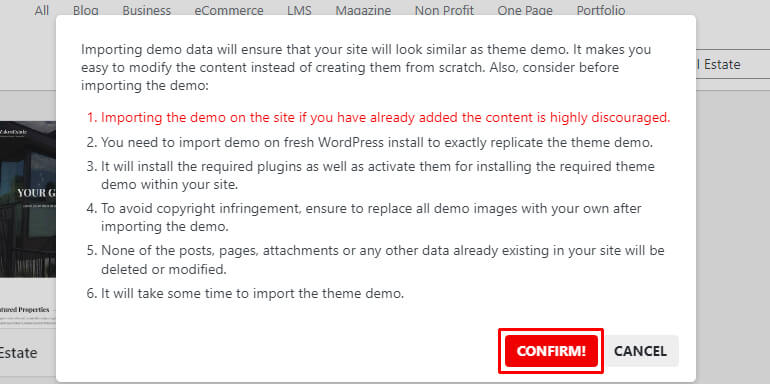
You do not need to install these plugins because they’ll be installed automatically when you click the Import button. Then, you’ll come across a dialogue box. So, click on the CONFIRM button.
In no time, you’ll see that your real estate website demo site is successfully imported. Now, you can start customizing your real estate website as required.
Step 5: Customize Your Real Estate Website
The next step of our tutorial on how to create a real estate website using WordPress is customizing the pages of your website using the WordPress Customizer.
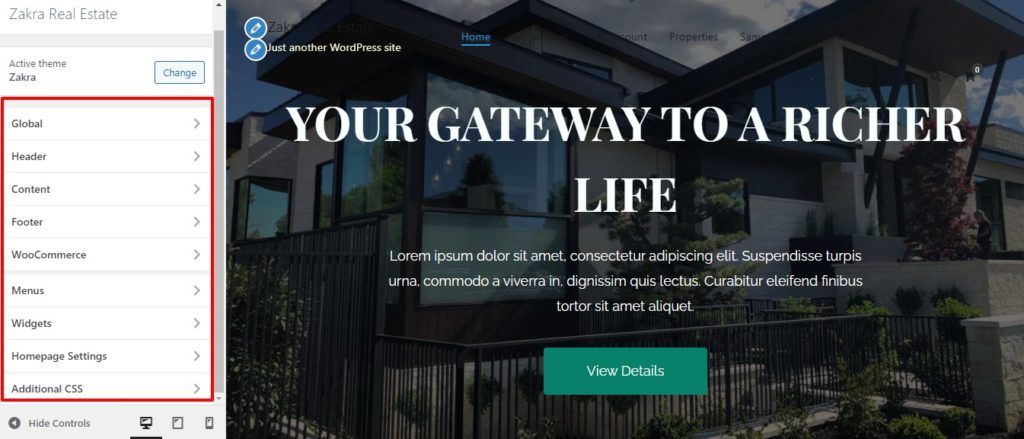
For this, go to Appearance >> Customize. And you’ll be able to make various changes to make your site professional and improve its functionality.
With Zakra, you can make the changes in a real-time and see the preview of how your site looks before publishing it.
You can find different customization options for the real estate template. So, let’s explore them briefly:
- Global: Customize elements like colors, layouts, background, typography, button, etc., globally.
- Header: Change site title, tagline, logo, etc.
- Content: Edit the appearance of content (images, fonts, color, change the order of blog posts).
- Footer: Change the footer widget style even enable or disable and more.
- WooCommerce: Display product catalog, change the appearance of the WooCommerce checkout.
- Colors: Customize the colors on any page.
- Menus: Easily add, delete, or customize menus of your site.
- Widgets: Add widgets to the sidebar and footer areas of your site.
- Homepage Settings: Choose what to display on the homepage (posts in reverse chronological order or a fixed/static page.)
- Additional CSS: Manually add CSS codes for further customization of your site.
Additionally, you’ll see three different icons next to the Hide Controls. These icons allow you to see how your site looks on desktops, tablets, and mobile devices.
Once you complete making all the necessary settings, hit on the Publish button at the top.
With that, you have successfully created a real estate website using WordPress.
Wrapping Up!
So, this was our article on how to create a real estate website using WordPress.
We hope that you’re now able to create a real estate website. With an incredible theme like Zakra, the process is quite simple.
If this article has helped you then, please don’t forget to share it on your social channel.
Want to check out more of our WordPress-relevant beginner-friendly tutorials? Then, check out the article on creating a WordPress site with Zakra and Brizy Builder.
Lastly, you can also follow us on Facebook and Twitter to stay updated about our latest blogs.


![Zakra 3.0 | Zakra Pro 2.0 Release [Major Updates!]](https://i.ytimg.com/vi/g3rifl7kWvg/maxresdefault.jpg)