Wondering how to make an online WordPress application form? Well, stick with us till the end to find out how.
Job applications nowadays don’t only rely on applicants’ documents. Qualifications may vary depending on the job’s nature. Sometimes an applicant’s resume doesn’t cover the employer’s interest.
Hence, employers add WordPress application form to their websites in order to avoid crises. In this article, we’re going to give you a detailed guide on how to create a job application form in WordPress.
Best Tool to Create a WordPress Application Form
A WordPress application form isn’t only beneficial for employers but helps interested candidates as well. They can add specific criteria that meet the employers’ needs.
This saves time for both the employers and the job seeker.
Did you know creating a WordPress application form is a piece of cake? All you need to do is install the best WordPress job application form plugin Everest Forms. Then follow a few simple steps and you’re good to go.
Everest Forms is the best all-rounder drag-and-drop form builder plugin that lets you create any online form. Forms such as contact forms, surveys, quizzes, donations, and most importantly job application forms. Therefore, Everest Forms lets you learn about your candidate’s status according to your requirement.
Now in this article, we’re going to show you how you can create a Job application form using two methods:
- Creating a job application form from scratch.
- Creating a job application form with a pre-built template.
So, without wasting more time, let’s find out how exactly this WordPress job application form plugin works.
How to Make an Application Form Using Everest Forms
The following are the steps you need to follow to add a WordPress application form to your site:
Step 1: Install and Activate Everest Forms and Everest Forms Pro
The first thing you need to do is Install and Activate Everest Forms on your WordPress dashboard. For a detailed guide, you can go through our article on how to install a plugin.
Also, you can check out our YouTube video for more detailed information.
It’s true, you can create a simple job application for your WordPress site using the free version of Everest Forms.
However, if you want to save time then, we suggest you use the pre-built template. The pre-built template comes with the premium version of Everest Forms. Hence, you need to install Everest Forms Pro. For that visit Everest Form’s official website first.
Next, follow this step-by-step guide to install the Everest Forms Pro version.
Now you can easily unlock the online application form template and automatically install the Style Customizer add-on.
Step 2: Create a New Job WordPress Application Form
Now that you’ve completed all the procedures it’s time, we learn how to create a new job application form. As mentioned above we’ll show you how you can create a form using two different methods:
Building a Job Application Form from Scratch
Building a job application form from scratch can be a bit time-consuming and requires extra effort. As you’ll be adding all the required fields on your own. However, if you’ve time, it shouldn’t be that hard.
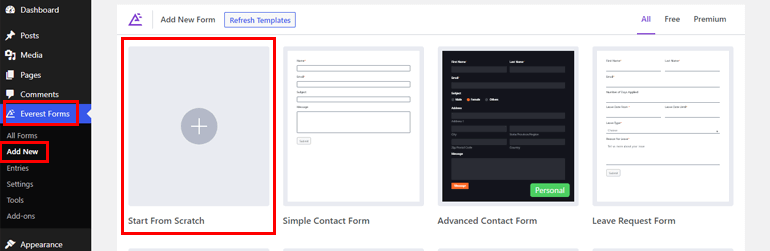
All you need to do is navigate to Everest Forms >> Add New from your WordPress dashboard. Then click on the Start from scratch from the template option.
After that start adding the necessary fields using the drag-and-drop method. You can further customize the WordPress application form as per your requirements. If you need detailed instructions to customize your form, visit how to customize a form in WordPress
Building a Job Application with a Pre-built Template
Pre-built templates will save both your time and energy. All the required fields are already there therefore, you won’t be putting more effort into the form creation process.
Since you’ve got the pro version of Everest Forms go to Everest Forms >> Add New. There you’ll see various form templates, just scroll down to find the Job Application Form.
Once you find it simply click on the Get Started button, here you need to name the untitled form. You’ll also see that you require a Style Customizer add-on.
But don’t worry about it, it’ll automatically activate after purchasing Everest Forms pro. This add-on permits you to further customize all the components on your form. Now click on Continue to customize your job application form.

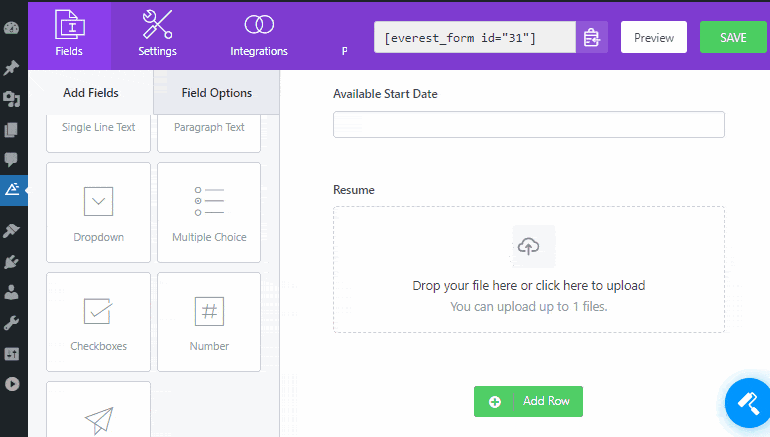
Step 3: Customize the WordPress Application Form
Since you’ve got the template, you might require more fields. In that case, just drag and drop the desired field on your WordPress application form.
However, to delete the extra field you can navigate to the field you want to remove and click on the delete icon.
You can add various fields to create a job application form. There are two major form fields on Everest Forms:
- General Field
- Advanced Field
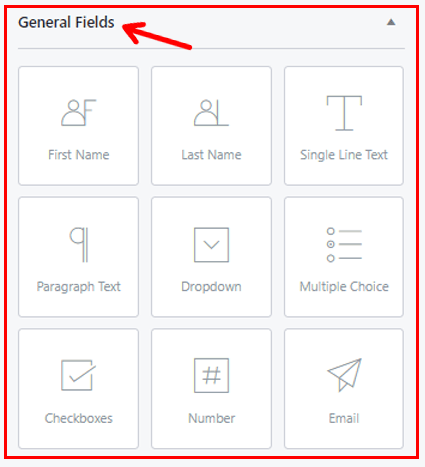
General Field
Besides common fields, there are many other general fields that you might consider applying to your job application form such as:
- Single Line Text Field: For acquiring one-line text information from the applicants.
- Paragraph Text Field: To obtain information about your candidate in paragraph form. You can use this field if you want to get long information about your applicants.
- Dropdown: Lets you add multiple options, this way your candidate can select from the options you provide.
- Multiple Choice: For adding multiple choices so that applicants can choose any option.
- Checkboxes: Similar to multiple choices, you can use checkboxes to display multiple choices but in checkbox form. However, unlike multiple choice users are allowed to select more than one option with this field.
Advanced Field
Advanced fields of Everest Forms include the following fields:
- Website/URL: Lets your applicants add their personal or company’s site URL.
- Date/Time: Lets your candidates add the requested date and time on the job application form.
Besides these two, you’ll get access to the following additional fields:
- Image Upload Field: With this, candidates can upload images in multiple formats like jpg, gif, Png, BMP, etc. Moreover, it allows you to configure additional settings like maximum image size, maximum number limit of file uploads, and so on.
- File Upload Field: Allows applicants to upload files. This also lets you change the label.
You can also set criteria according to your preference with the File Upload Field. Like, configure settings for allowed file extensions (docs/pdf), maximum file size, and limits on upload for the images.
Furthermore, Everest Forms Pro permits saving the uploaded files to Google Drive and Dropbox. On top of that, there are Hidden Fields, Phone, Password, and Custom HTML which can be utilized for your application form.

Note: Different fields will be displayed if you further add Everest Forms Add-ons.
Enable Conditional Logic
Everest Forms offers Conditional Logic which saves you from the lengthy and complex form. You can configure fields to display or hide based on your applicant’s response to a field. Thus, enabling conditional logic makes form filling process easy for your applicants.
Now to enable conditional logic add a Multiple-Choice field to the desired area of your form. Click it to edit and Label it according to you. For eg: you can add (“Have you worked before?”) and simply add the choices (Yes and No).
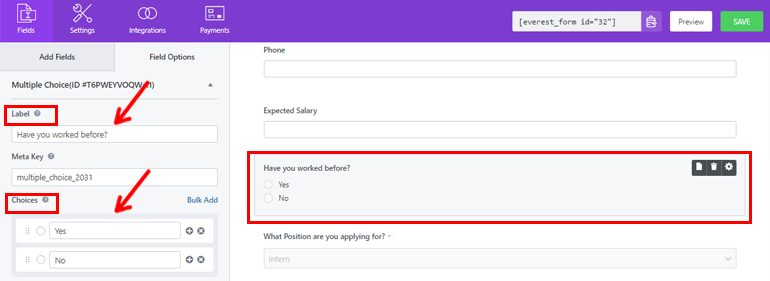
Once you’re done you can add a Single Line Text Field right under it. After that to edit the field, click on it and label it (Reason for leaving the previous job). Finally, you can scroll down and enable conditional logic.
Finally, click on Show.

Step 4: Configure Form Settings
In this step, we’ll configure the form settings. You can find this tab right next to the Fileds tab. There are three options you can configure:
- General
- WebHook
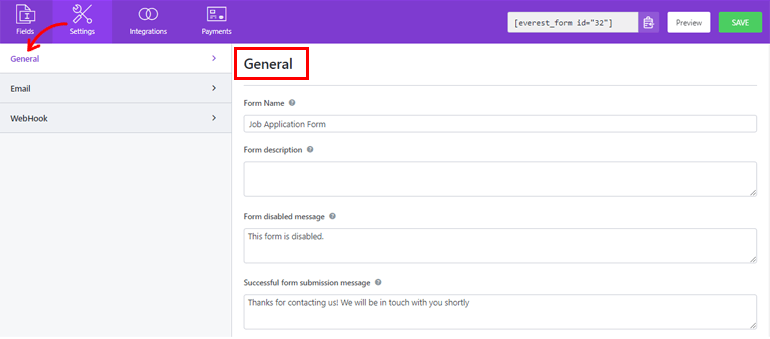
General
Under General settings, you can make changes as mentioned below:
- Form Name: Gives/edit name of your form.
- Form Description: Lets you add a brief description of the motive of your form.
- Form Disable Message: Displays the message once you disable the form.
- Successful Form Submission Message: Displays text to the applicants after their form submission is successful.
- Redirect To: Allows the applicant to be redirected to a preset URL after the submission of the form. The three Redirect To options that are available are
- Same page: This option is selected by default. The applicants will remain on the same page after the form is submitted.
- Custom page: You can choose between different pages from the drop-down and applicants will land on the page you selected.
- External URL: You can insert an external URL. After this, the applicants will be redirected to the URL after form submission.
- Layout Design: Enables you to choose pre-made layouts. You can select from two layouts, either Default Layout or Classic Layout.
- Form Class: Adds a class for your form
- Submit Button Text: Allows naming the Submit button to your preference. For instance, instead of naming Submit, you can use Send, Apply, etc.
- Submit Button Processing Text: Lets you set text in the button while the form is being processed.
- Submit Button Class: With this, you can add CSS class names for the submit button.
The pro version of Everest Forms comes with many advantages. Like you can Enable Conditional Logic for the submit button. Moreover, you can also Enable anti-spam honey pot to prevent spam on your form.
Further, to disable saving entries to your database, enable Disable Storing Entry Information. And after configuring all the settings according to your requirements click on the Save button.
This option allows you to configure form notifications. This way you’ll get notified every time your applicants submit the forms. Besides, you can even notify your applicants if their forms have been received by the department concerned.
Now to move further, go to Settings >> Email and turn on Email Settings. With Everest Forms, you can set up unlimited email notifications. Such as:
- Admin Email Notification
- User Email Notification
- WebHook
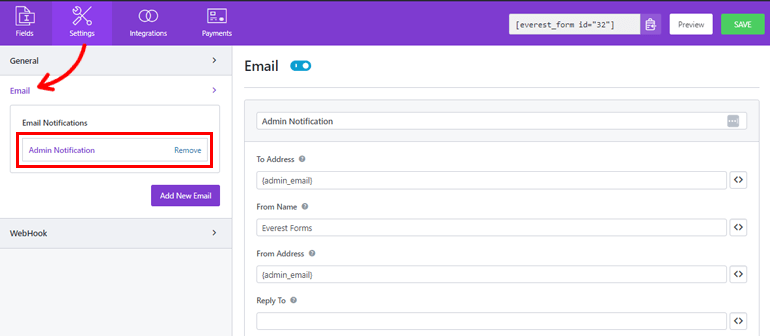
Admin Email Notification
To set it up navigate to Settings >> Email >> Notification and make changes to the given fields.
- To Address: Here add the email address you wish to receive email notifications. You can just add the admin’s email address.
- From Name: Here admins can add the desired name they wish to be displayed while sending the form.
Make sure that the name field is marked required otherwise it might create a problem during mail delivery.
- From Address: Add the email address from where the forms are sent. You can simply add the admin’s email here as well.
- Reply To: Allows you to add the email address to which you want the email to be replied. It can be the email address of the applicant. You can also use smart tags to automatically get the applicant’s email address.
- Email Subject: This field is for adding the subject to the email.
- Email Message: This field is for adding an email message that you want to send along with your form.
User Email Notification
User Email Notification sets the notification for the applicants. Sending a confirmation email after receiving their form can let them know that you’ve successfully received their form.
For this go to Settings >> Email and click on the Add New Email button and name it to get started. You can name it anything you want, here we’ll name it “User Notification”. Now, move forward to configure the following settings:
- To Address: For this, you can use the smart tag to get the email address of the applicant who submitted the form.
- From Name: Simply add your business or company’s site name.
- From Address: Here add the admin’s email address.
- Reply To: Add the admin’s email here as well.
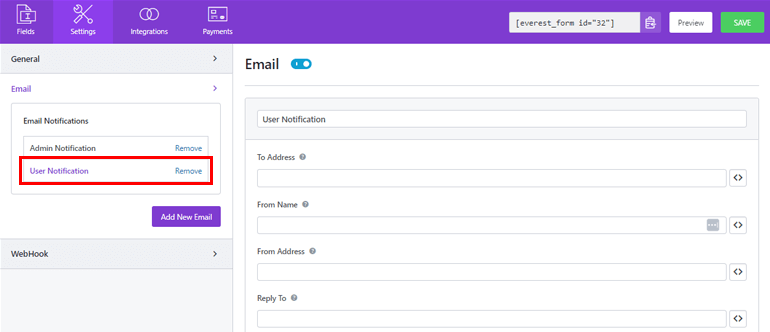
Email Subject and Email Message can also be added here like before.
WebHook
With webhook, you can send the form’s data to any external URL.
For configuring webhook settings navigate to Settings >> Webhook and click on Enable WebHook. You can now move forward to add the following fields:
Request URL: Here add the desired URL to which you’d like to receive the data. You can simply add the admin’s address here.
Request Method: There are a few methods by which you can send the data. They’re GET, POST, PUT, PATCH, and DELETE.
Request Format: Here you can select the format for webhook requests. Choose either FORM or JSON from the drop-down menu.
Request Header: You can select any header from the drop-down menu if it needs to be sent with the webhook request.

Step 5: Add Job Application Form to Your Website
You’ve successfully created a WordPress application form using Everest Forms. But it won’t be visible to your users unless you display it on your WordPress website.
Hence, to add a job form to your site, you can use two methods, one is by using Shortcode.
To use the shortcode navigate to Everest Forms >> All Forms. There you’ll see the WordPress application form you’ve created along with its shortcode. Now copy the shortcode of your online form to display it on your site
The next thing you need to do is create a new page or post, you’ll get to the Gutenberg editor. Here press on the add block icon and search for the shortcode block and click it to add a block.
Here paste the shortcode you just copied and click on the Publish button. That’s it, your job application form will be displayed on your site.

The next option is by using the Everest Forms block. For that alternatively, go to Posts/Pages >> Add New.
Then, click on the ‘Add Block (+)’ button and search for the Everest Forms block and click it. Once you’re done, select your WordPress job application form from the drop-down menus.
Finally, you can hit the ‘Publish’ button at the top right. And there it’s, you’ve your application form successfully created and published for your applicants.

Wrapping It Up!
And that’s a wrap for our guide on how to make an online application form on WordPress. We hope you’ve learned how to create an online application in WordPress easily by now.
Don’t settle for half-featured plugins when it comes to creating an online job application form. Thankfully, we’ve got feature-rich form builder plugins like Everest Forms which gives you a clean and organized form.
Using Everest Forms you can find the best people as this makes it super easy for interested candidates to apply for the job. To find out why 100000+ users trust this plugin visit Everest Forms review.
Also, if you’re interested you can check out our article on how to make a multi-column form in WordPress.
Finally, if you like this blog, feel free to share it on your social sites. Also, don’t forget to follow us on Facebook and Twitter for future updates.


![Zakra 3.0 | Zakra Pro 2.0 Release [Major Updates!]](https://i.ytimg.com/vi/g3rifl7kWvg/maxresdefault.jpg)