Don’t know how to add confirm password field in WooCommerce registration form? Then, you’ve come to the right place. In this article, we’ve explained everything you need to know about adding confirm field in the WooCommerce registration field.
The main importance of adding a confirm password field in WooCommerce is to catch typos mistakes by making the users type their password twice. Using a registration plugin, you can achieve this with ease.
Therefore, if you want to learn how to add confirm password field in WooCommerce Registration form, make sure to stick with us till the end.
Choose a WordPress Plugin to Create and Add the WooCommerce Registration Form
The default WooCommerce registration form doesn’t come with confirm password field option. Hence, you need a third-party form builder plugin to create a custom registration form and add the confirm password field.
If you’re familiar with WordPress, you must know there’s a plethora of WordPress plugins available. Hence, it’s quite overwhelming to choose the right one.
The best plugin We can think of is User Registration by WPEverest. It’s one of the best user registration and login form plugins on the web. The plugin offers a drag-and-drop feature. Other than that, it also provides multiple templates to create forms easily.

Some of the highlight features of User Registration are:
- Send customized emails to your users
- Unlimited form fields
- Inbuilt login form
- Spam protection
- Import and export forms
- Smart conditional logic
With that said, let’s begin the step-by-step process on how to add confirm password field in WooCommerce registration form.
Add Confirm Password Field in WooCommerce Registration Form
1. Install and Activate the User Registration Pro Plugin
To add the confirm password field in WooCommerce registration form, you don’t necessarily need to install the free version of User Registration. Hence, let’s directly install the pro version.
For that, visit the official User Registration website and click on the Pricing tab to choose a plan suitable for you. After the payment process is complete, you’ll get an invoice in your mail. You’ll also find the link to log in to your WPEverest user account.
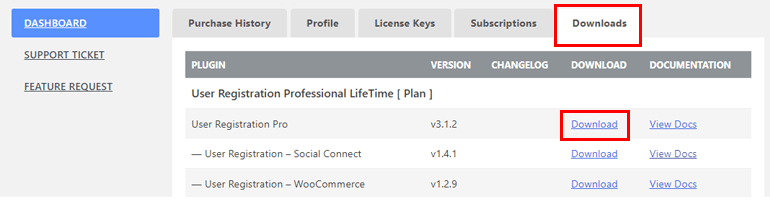
Once you’ve logged in to your user account, download the zipped file of User Registration Pro from the Downloads tab.
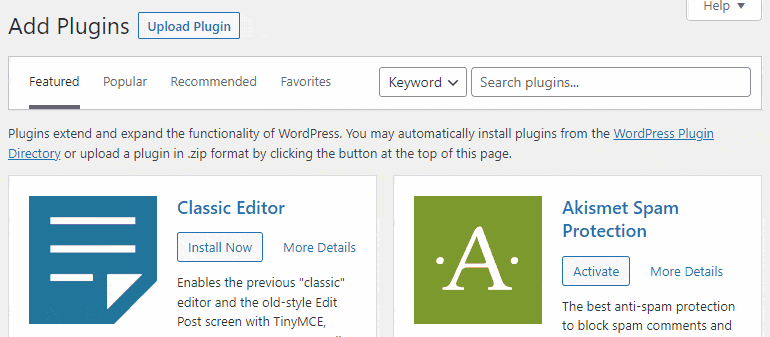
Now, log in to the WordPress dashboard and navigate to Plugins >> Add New.
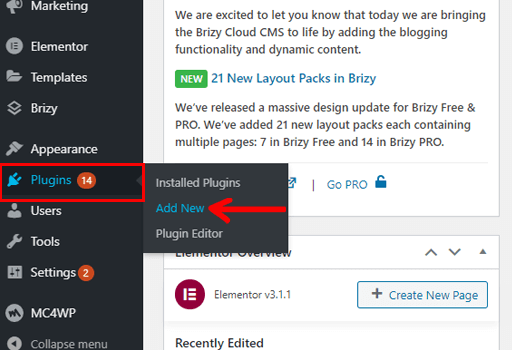
Thereafter, click on the Upload Plugin button. Choose the zipped file of User Registration, Install and lastly Activate it.
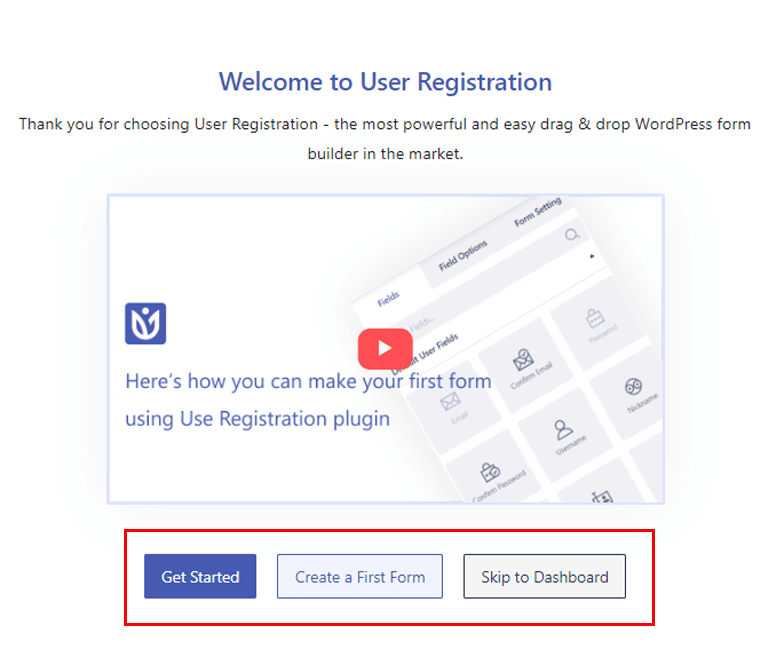
Setup Wizard will appear as soon as the plugin is activated. You can either Get Started, or Create a First Form, or Skip to Dashboard.
If you click on Get Started option, the plugin allows you to automatically install the Registration and My Account pages. Apart from that, you can configure General Settings. Under this option, you can enable the Anyone Can Register, set User Login Option, and choose whom to Prevent dashboard access.
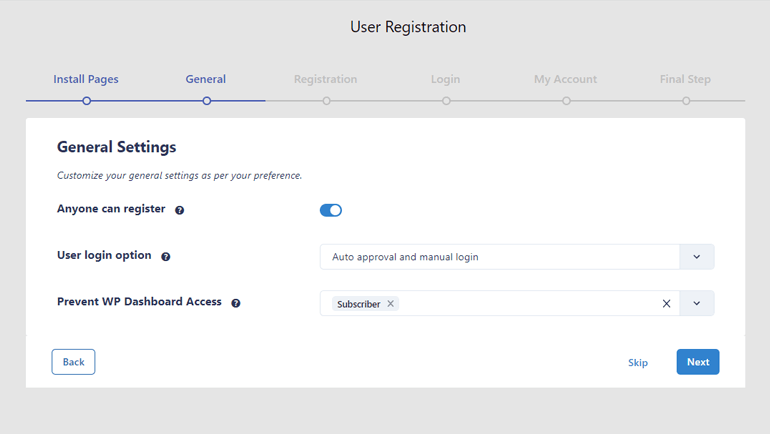
One of the most convenient features of User Registration is enabling the Anyone Can Register option right from the setup wizard. You don’t need to enable this option from the WordPress dashboard separately. Moreover, enabling this option allows your users to register to your website from the front end.
Other than that, the plugin allows you to configure Registration, Login, and My Account settings. The configuration on these options will be applied to all the settings of forms you create later.
At the Final Step of the setup process, three options are available – Create New Form, Edit Default Form, or Go to Dashboard.
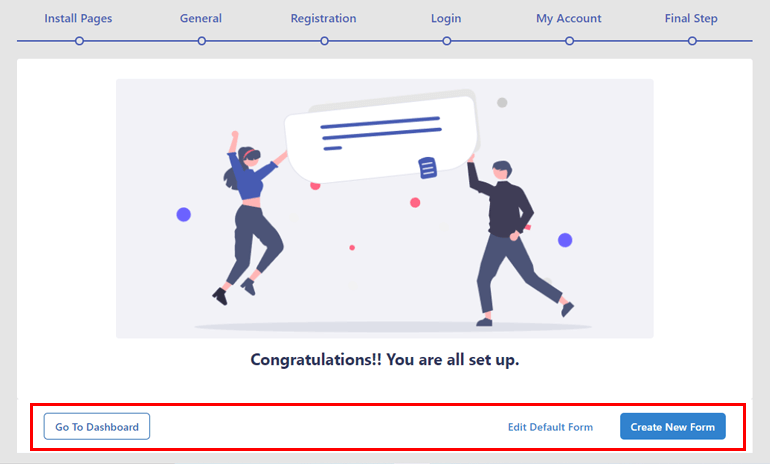
As the name suggests, Create New Form will take you directly to the form builder page. And if you choose Edit Default Form, you can edit the form provided by the plugin.
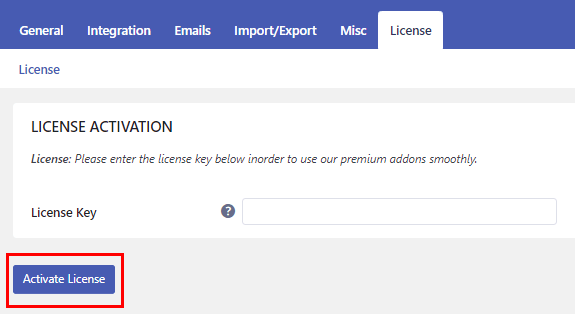
For now, let’s Go to Dashboard. You’ll see a message Please enter your license key at the top. Click on the message and enter the license key that you can find under the License Key tab on your user account. Hit the Activate License button to finally activate the plugin.
2. Install and Activate WooCommerce Add-on
After the successful installation of User Registration Pro, you’re required to install the WooCommerce Add-on as well. Simply navigate to User Registration >> Extensions.
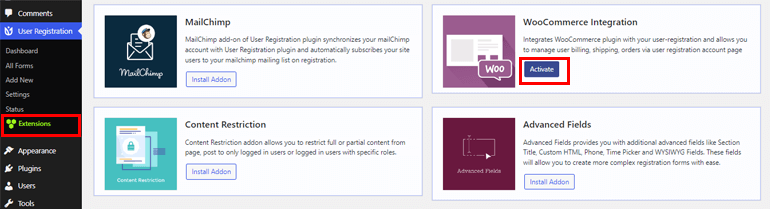
Search for the WooCommerce Integration addon, hover over it, and hit the Install Addon button.
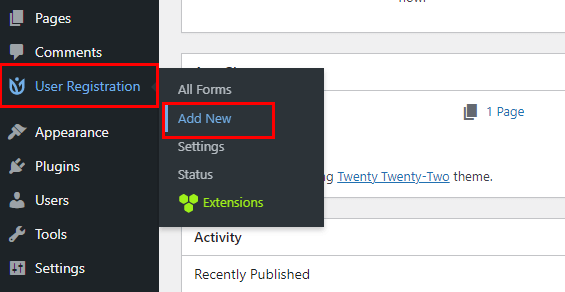
3. Create a New WooCommerce Registration Form
The next step on how to add confirm password field in WooCommerce registration form is to create a new WooCommerce registration form. Click on User Registration >> Add New.
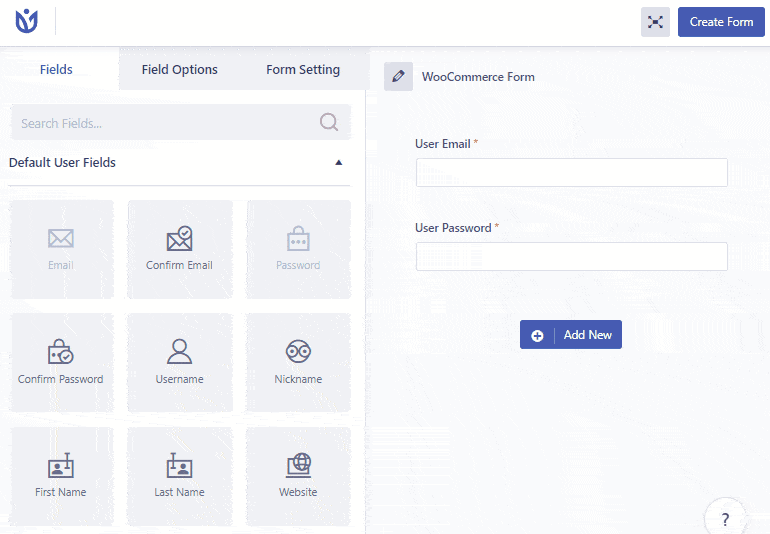
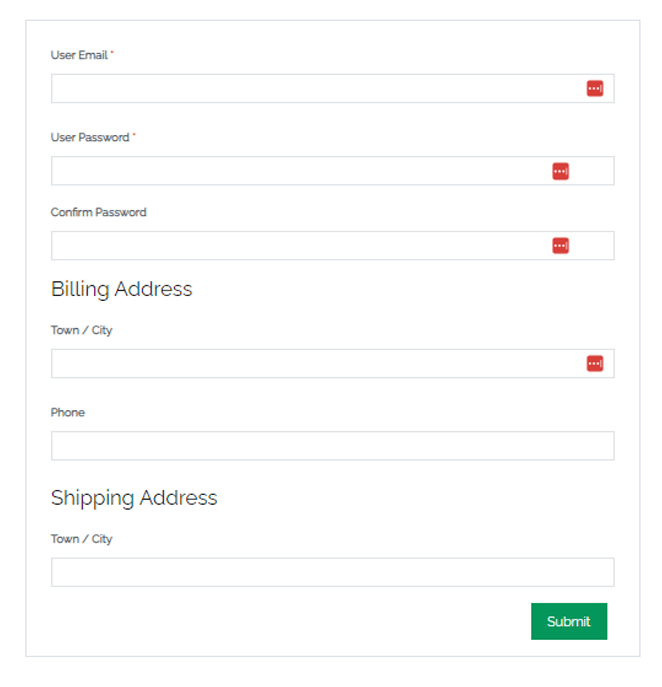
Two default fields – User Email and User Password are already available. Further, you can add WooCommerce fields in your form. If you scroll down, you can see WooCommerce Billing Address and WooCommerce Shipping Address section. Don’t forget to name your form as well.
All you need to do is drag the field of your choice and drop it on the form. You can add as many fields as you want.
Add Confirm Password Field on WooCommerce Registration Form
To add the confirm password field, go to the Default User Fields section. There you’ll find the Confirm Password field. Drag the field and drop it on the form as shown in the above step.
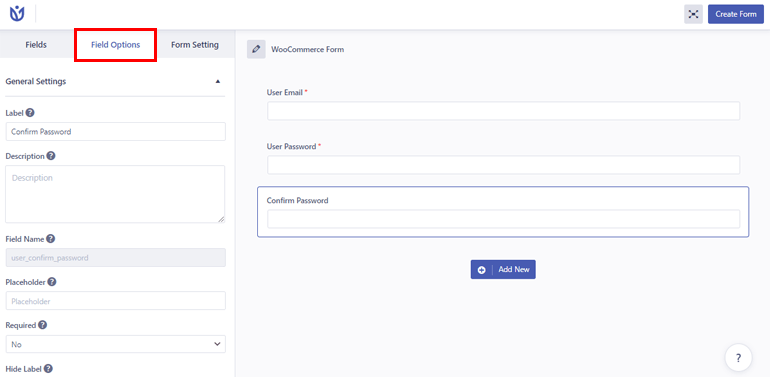
Customize Form Settings
The User Registration plugin allows you to customize your form through the Field Options section as per your requirement.
You can edit the Label, Description, Field Name, Placeholder, and Hide Label. Further, you can also decide whether you want to make a field Required or not. On the Advance Settings option, you can add Custom Class.
Click on the Create Form button located at the top right. And that’s how you can create and customize a WooCommerce registration form with a Confirm Password field.
You can also Preview to see how your form looks and make changes if you’re not satisfied. However, don’t forget to click on the Update Form button to save the necessary changes.
4. Configure Registration Form Settings
You need to configure form settings to finally make your form ready before publishing. Open the Form Setting tab. There are two options you can configure – General and Extras.
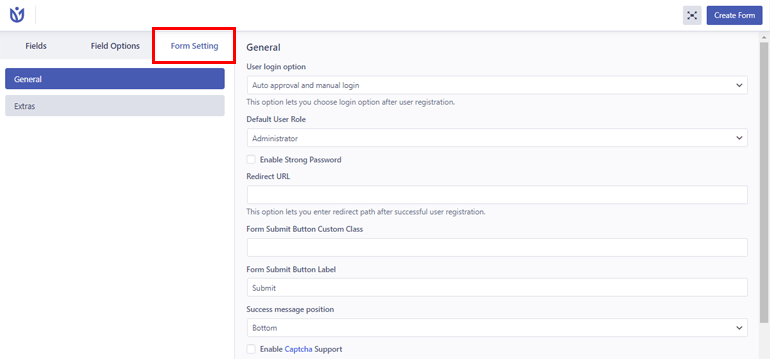
We’ve configured most of the settings at the beginning after the activation of the plugin. Hence, you don’t need to configure those settings. Additionally, you can set up other setting options such as add custom CSS class, enable Captcha support, etc.
5. Replace Default WooCommerce Registration Form with Custom Form
Till now we’ve created a WooCommerce form, customized it, and configured essential settings. Next thing is to replace the default WooCommerce registration form with a custom form we just created.
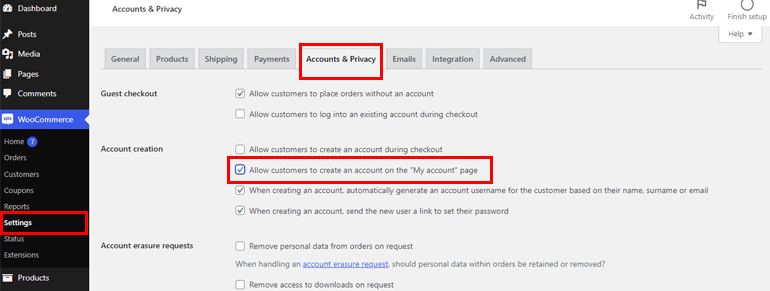
So, how do we do that? It’s simple, click on the Settings option under the WooCommerce tab. Select the Account & Privacy tab and scroll down to the Account Creation section. Next, tick the checkbox for Allow customers to create an account on the “My Account” page option.
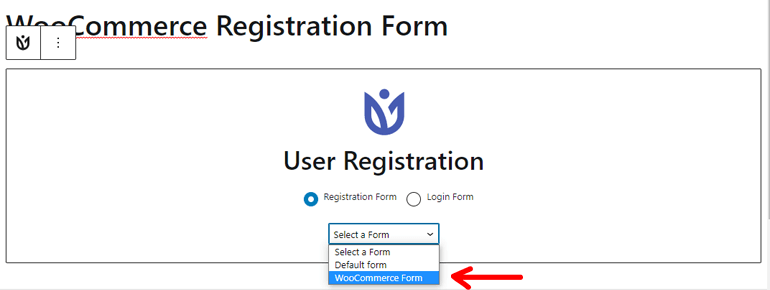
Further, go to User Registration >> Settings and open the WooCommerce tab. Then, choose the custom WooCommerce registration form we created earlier. Don’t forget to select the Replace registration page and Save Changes.

6. Publish The Form on Your Website
We’re at the end step of adding extra fields to the WordPress registration form. In order to make the form visible to your users, you need to publish your form.
Go to the page/post where you want to display the form. Click on the Plus [+] icon and search for User Registration.
Next, select the form you created earlier from the dropdown. Finally, click on the Publish button located at the top right.
This is how your form will look if you preview it.
PS: This is how the form looks if you install Zakra theme.
Wrapping It Up!
And that’s all I’ve to say about how to add confirm password field in WooCommerce registration form.
First of all, you need to allow users to register to your site via the front end. Creating a WooCommerce registration form and adding confirm password field with the help of User Registration is the next step.
You can further customize the form and configure the settings as well. After you’ve replaced the default WooCommerce registration form with the custom form, you can publish the form.
If you follow these steps, adding a confirm password field in your WooCommerce registration form won’t be a problem at all.
Finally, it’s a wrap. Hope you enjoyed reading this article and if you did, why not share it on your social media? You can also follow us on Twitter and Facebook to get regular updates and exciting news.
Before you go, here are some of the important articles on how to easily create breadcrumbs in WordPress for SEO and how to change post layouts in WordPress.